December Calendar Page

Hello, again!  I finally finished my last calendar page of 2014…….December.  Finding time to create has been difficult lately, so I hope you will excuse my tardiness!  The page is quite simple, but it still took time to get all the greenery in place!   Hope you like it!
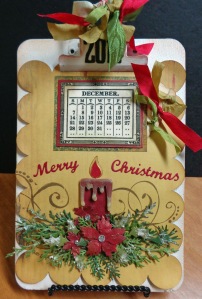
December calendar pageI used a Cosmo Cricket paper for the background and stamped the swirls on the paper to create some “motion” around the area for the centerpiece.  I used the candle die set from Elizabeth Craft to create the centerpiece for my page, combined with some of the dies from the Christmas Greenery thin die set by Tim Holtz.  The small poinsettias are from the candle set and the larger one is a Tim Holtz die.  The  “Merry Christmas” is an Elizabeth Craft die.

The candle is two pieces: the base and the “dripping” topper.  After cutting, I embossed the pieces with clear embossing powder, to give a shine.  Next, I dipped the topper into hot wax which I melted using the Ranger Melting pot.  I love the melted wax affect!

To make the centerpiece, I glued the candle to the page, then added layers of greenery, gluing the pieces at the base to leave the ends loose and “fluffy”.  Once the greenery was in place, I added the flowers (treated with gold rub and sprayed with gold glimmer mist).   To finish it off, I created a snowy accent on the greenery  using dabs of embossing paste (I used my finger tips to apply it) and added rhinestone centers to the flowers to help create a reflective sparkle.

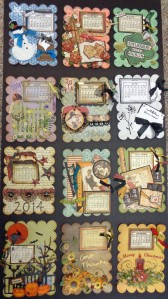
So….my 2014 mini calendar project has come to an end!  Here is a snapshot of the pages:

12 calendars

I hope you enjoyed following along as I created these pages.  It was a fun project and I hope it helped inspire you to create!

I had so many Christmas related projects I wanted to make and couldn’t, so I have decided to work on them now.  Some of the projects include cards, mason jars and bottles, and more home decor.  Stay tuned and stay crafting!

Thanks for visiting my blog.  I always enjoy and appreciate getting your comments!

Posted in General | Leave a comment

Altered Wall Art

Hello, friends!  Merry Christmas and Happy New Year to all of you!

It feels good to be back on my blog and in my “Creation Station” (my new name for my craft/work Studio!  Perhaps the new name will inspire my creative juices when I enter the area!  It seems like it’s been months since I’ve been working on projects and I’m excited to show you what I was working on when I had to shut it all down and attend to other priorities.

I wanted to make some Christmas wall art and found some framed artwork in a local store that I thought would be perfect to alter.  I like what I managed to get done before I had to set it aside.

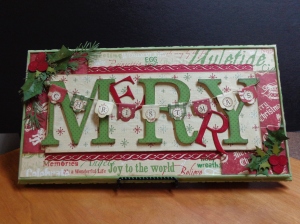
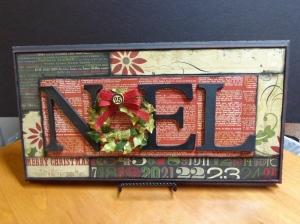
DSC00928This one was fun to make, but it really lacked something until I added the punched rope border around the center.  The border really set it off.  I used old Flair paper, along with some from Melissa Frances. I adorned the corners with greenery cut with Tim Holtz’s Holiday Greens and Holly Branch dies and  AccuCut’s holly leaves and berries die.  I made the banner using Sizzix framelits Hearts of Flutter die. I stamped each letter to cardstock, punched them out and glued the circles to the banner pieces.  I used some of my 4″ Roman letters and found some other chipboard letters for the E and R, which I painted with red chalk paint.

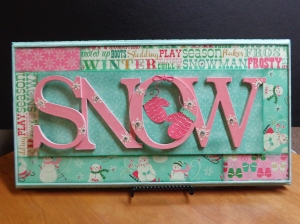
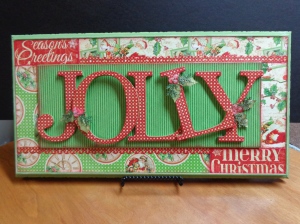
DSC00930DSC00934DSC00937The frames measure 9 x 16 inches and can hang on the wall or be placed on an easel, like I have here.    I won’t bore you with all the details of each one, but I will say I used gesso as a base coat, then painted them with various colors of chalk paint before covering them with paper.

So…..Do you have a favorite?  I’d love to hear your comments, or if you want any additional information, just send me an email!

Posted in Mixed Media and Altered Art | 1 Comment

November Calendar Page

Hello everyone!  Seems like a lot has happened since I posted my October Calendar Page. I had hoped to get back sooner than this, but I have been busy with my Mother.  She is in rehab now,  following a short stint at the hospital, where she was taken after a fall.  Hopefully, we’ll get her discharged later this month and settled in to a new home.  Difficult times……… Your prayers are welcome!

So, here we are in November and my  Page is finished!

nov pg

If you’re new to my blog, today’s post is part of a monthly project I began in January.  To get all the details for the project, visit the “New Year – New Ideas” post from January 6th.  Thanks for checking out my blog and I hope you’ll follow along!

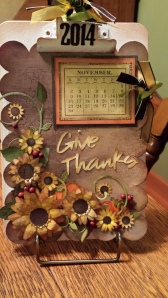
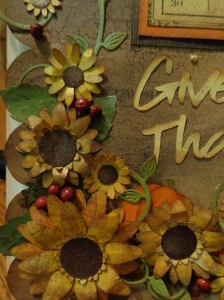
I used the silhouette machine to cut the sunflowers, pumpkins, the teeny oak leaves and the words.  I used a Heartfelt Creations die for the large flourish leaves, and I believe a Memory Box die for the other.  I used circle punches for the centers of the flowers and added some berries from my stash.  The background paper is from an old Diane’s Daughter collection.

The two medium flowers and the largest have three layers of petals.  The smaller flowers have two and the smallest have just one.   The silhouette allows you to resize any shape, which is great and came in handy for this layout. I made several different sizes and was   I actually used a daisy punch for the two brighter yellow flowers on the page.

124

I added a small petal layer under the larger centers, sized just big enough to show the tips of the petals.  Once the flowers were assembled  and inked, I sprayed each piece with at least one of several glimmer mists (I’ll list what I used at the end).  I played with the layout until I was satisfied, then (big tip) I took a picture of it with my phone!  Quite often I  get things all laid out but can never quite put them back the same way, so I started taking a quick picture for reference.   Have any of you done that?  It has worked great for me!


Below is a list of the sprays I used on the pieces.

  • Perfect Pearls Mists:  Biscotti, Heirloom gold
  • Plain Jane:  matte mist baseboard – Red Rocks
  • Tattered Angels Glimmer Mist: starfish, iridescent gold
  • Distress Ink:  ripe persimmon, spiced marmalade, vintage photo, walnut stain, mustard seed

I hope you like the layout and I wish all of you a very Happy Thanksgiving Day!

Once again, I’d love to hear your comments!
Posted in General | 4 Comments

October Calendar Page

Wow,  October page is done!   It’s hard to believe that October is almost over.  The leaves are falling, the air is cooler and our days are getting shorter.  Halloween is right around the corner and this month’s calendar page is getting me ready!   This page was fun to create and I worked with a few products I haven’t used in a long time, so that was great!  I hope this page gives you a little Halloween inspiration!

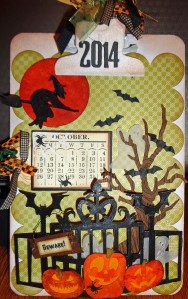
October PageI used the Silhouette for most of my shapes on this page.  The tree is a Tim Holtz die and the ghosts were cut from a zip-e-cut die (from AccuCut several years ago).  The gate, witch, bats, pumpkins, spiders and web are all  silhouette shapes.

I wanted the moon to resemble a blood moon,, but also wanted some texture, so I applied some Dream Weaver embossing paste in spots…just to give it some bumps!   Once it was dry I was able to ink it with distress inks: spiced marmalade and ripe persimmon.  I went over it lightly with vintage photo, then inked the edges.  I used the same process for the pumpkins.  I painted the witch with Tattered Angels Stiletto Glimmer Glam, a subtle glitter paint.

I folded the bats at the points to give them a little dimension and a sort of “joint” effect.  It looks much better than just gluing down the flat shape!  I cut the tree out using brown cardstock, then embossed it in a “wood grain” embossing folder by Darice.   I inked over it with Walnut distress ink to finish it off and glued it down at the trunk only, because I wanted the branches left loose to “flow”.

When I saw the gate, I knew it was the one to use on this page. Actually, the gate drove the theme for the page.  I cut two and glued them together to make it nice and sturdy.  I painted it entirely with gesso and let it dry.  Next, I used my finger to rub silver “Inka Gold” over some of the edges and parts of the body of the gate.    I “bowed” the gate across the page by only attaching it at the very ends.

I made the sign base by cutting a strip of brown, put it in the wood grain embossing folder, then cut the edges with decorative scissors.  I typed the word “Beware” using a Creepy font, then printed it, trimmed it, inked it and glued it to my wood sign.  I attached a wire at each end to hang it from the gate.

The ghosts are vellum, cut with the emboss and cut zip-e die.  I used a felt permanent marker to color the eyes, then placed them around the page.

I sprayed the spider web with Whisper White spray Webbing before gluing it to the calendar.

calendarThat’s about it for this page!  Please email me if you have any questions and, of course, I would love your feedback!


Posted in Mixed Media and Altered Art | 1 Comment

September Calendar Page

Hello Friends!

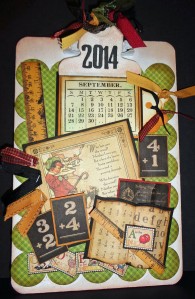
Graphic 45 papers, ribbons, staples, lots of dimension and layers and some “fussy cutting” and finally, September Calendar page is done!  Actually, I really like the ABC Primer paper line and had it in an 8×8 paper pad, which works well for these smaller projects, so I had to use it!  school pageThis page depicts school days of a time gone by, for sure!  I did a lot of fussy cutting on this, cutting out the flash cards, nursery rhyme, rulers and little alphabet cards, but it was simple cutting and was quick to do.

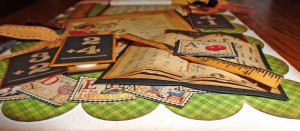
I made the book using Spellbinder’s Label 7 die set.  I cut out three different layers for pages, then cut the cover from the next larger die, using black cardstock. The cover was a little larger than I wanted, so  I trimmed a little off, all the way around, for a more realistic book appearance.  I used the tiny attacher to staple the pages to the cover.

bookBefore I stapled the pages, I inked them, then sprayed them with Ink Refresher.  The spray makes the paper more pliable to work with and I was able to “form” the pages for an open book appearance.  The spray also gives the paper a different texture….almost a leathery feel. Once dry, it holds the shape well.  The picture above shows the layered look of the book, as well as other layers on the page.  I used two different sizes of pop dots to raise layers at different levels.

I stapled the alphabet cards together randomly, then glued them to the bottom.  I made a pocket under the calendar and inserted the tags, cut from the Sizzix scalloped tag die.

Hope you like it!


Posted in Mixed Media and Altered Art | Leave a comment

August Calendar Page

Hello Friends!  I’ve been feeling a little guilty about working (or “playing”) on some of the projects I’ve posted lately, yet not having my calendar pages caught up, so I’m doing my best to catch up this weekend!  August is now completed and the September page is half done!

Aug page

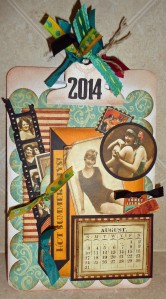
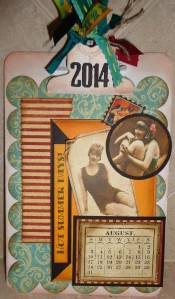
Papers from Graphic 45’s On The Boardwalk collection helped set the theme for August’s page. I love looking at vintage bathing suit photos so when I came across this paper, I knew it was perfect for August!  In addition to the Graphic 45 paper, I used an orange/yellow (sun dew) paper from Bobunny’s Key Lime collection.

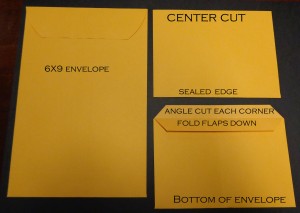
I started out with my scallop page, then added a piece of the striped paper.  The orange/yellow in the center is a pocket, made from a small (6×9) manilla envelope.  I cut it in half, angle-cut the corners of the open end (I fold them together to cut the angle, getting equal angles for each side), then I fold the tops down.  This creates a nice, solid opening for your pocket.

envelope pocket copyI typed the title Hot Summer Days on my computer and printed it on the BoBunny paper.  I cut of strip of black paper, glued it to the flap, then trimmed the corners.  Next, I trimmed the typed title to fit in the center of the flap.  I used the same paper I printed on to cover my pocket front and once I adhered it,  I glued the flap down, completing my pocket.

I cut one of the photos into a circle and matted it, then inked the other photo, curled the corner and adhered both to the page.  I inked, trimmed and matted my calendar and glued it to the page, at the bottom and sides.   I added a “postage stamp” accent to the top photo, which completed my basic page.

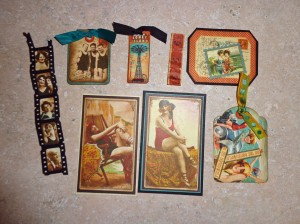
basic pageI cut a black mini filmstrip from Tim Holtz’s die, then cut and glued little photos to it. Next,  I cut out (or punched out) tags and memorabilia, inked them up, matted some and added ribbons.  Some of these will be used for the special date reminders for the month. The following photo shows the different items that were added to the page.

page partsI put some of these in the pocket I made from the envelope and some are in the calendar pocket, created when I left the top unglued.

Finally, I used the “WANTED” numbers from a Tim Holtz strip die, cut them in black and adhered them to the clipboard.

I hope you like the page.  It’s difficult to add a lot to a small page, so I make good use of pockets when I can.  If you’ve never made an envelope pocket before, I hope this gives you some ideas of how you can add them to your pages.  They are really quite simple to make (and there’s lots more you can do with them) ……just sayin!  Perhaps I’ll post a sample soon….

Once again, if you see something here or in any of the other pages or projects that you would really like to create, but need help or a class, just let me know by email. I would love to help you!

Thanks for viewing this.  I’ll be back soon with September’s page.  And remember, calendars like this make great Christmas Gifts!

Posted in General | Leave a comment

Halloween Steampunk Frame

I will say, this isn’t at all what I intended to work on today but it is my end result and thought I would share!

steampunk2

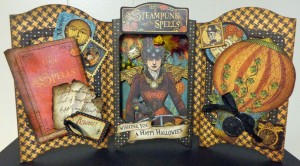
I made this using the AccuCut Shadow Box Portrait Frame Die set and papers from Graphic 45 Steampunk Spells Halloween collection.

I did a lot of “fussy cutting” on this, as you can see, but it was fun!

I’d love to hear your comments, so let me know what you think!


Posted in General | Leave a comment

Fall Pumpkin Wreath

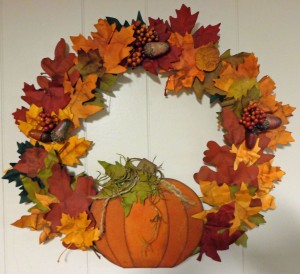
Hello everyone!  I hope you’re beginning to see some beautiful fall colors where you live.  Fall in Michigan is such a gorgeous season with shades of red, orange and yellow, mixed with different shades of greens, golds and browns, everywhere you look.   There’s a crispness in the air and I can’t help but feel a little energy explode in me!  The changes taking place outside inspired me to work on a fall project, so I decided to start with this wreath!

wreathFor the base of my wreath, I used a 12″ wreath circle board I purchased at Michaels. I covered that with a green cardstock; then I used my silhouette machine to cut out a variety of leaves from a few different colors of cardstock.

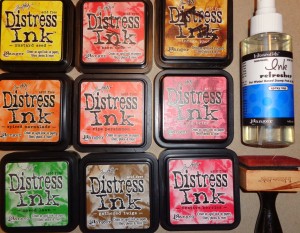
These are the supplies I used to fashion my leaves:

wreath suppliesI inked the leaves, sprayed them with ink refresher, then wadded them up to “distress” them.  Once the leaves were dry, I inked the wrinkles with the browns and I must say, I love how they turned out!

I used the pumpkin pieces from my AccuCut Pumpkin Album Die to cut and create the chipboard pumpkin.

chipboard pumpkinI inked the chipboard, using different shades of orange and red, until I got the blended color I wanted.  I used the brown on the edges to help create more dimension and used a little brown with green on the stem.  Then I assembled the pieces and glued them together.

I finished the pumpkin by adding leaves I cut with the silhouette and a little Spanish moss greenery.  I glued my pumpkin to the base of the wreath, then began adding all the different leaves.  I wanted the leaves to be open and “airy” on the project, so I only glued a small area of each leaf (usually the center) to the wreath.

I purchased a fall floral pick that had  berries and acorns in it,  cut them off and used them to finish the wreath.  I hope you like it and I hope it inspires you to create something with fall in mind!

Posted in General | 1 Comment

June Calendar Page

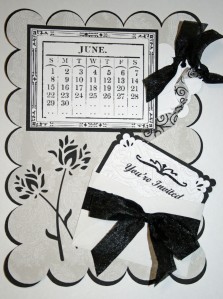
When I think of June, I think of weddings, graduations, etc., so I wanted my June calendar page to reflect that.  I decided to create the page with a “mock” invitation, some flowers and an elegant appearance and this is what I came up with!  I’m pleased with the way it turned out and hope you like it as well!

june calendar pageThe background paper is a wedding paper “Elopement” by Little Yellow Bicycle.  It has a subtle paisley/floral pattern on it that adds a touch of elegance and dimension to the page.  I cut a second scalloped page out for this in black and made it slightly larger to create a mat for this layout, which helped set this page off.

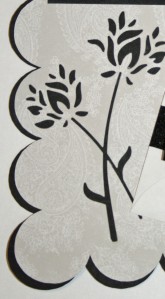
For the flowers I wanted to add to this page, I decided to use the “Wild Blooms” die by Memory Box.  The die cuts a silhouette into the paper and the black mat really makes it stand out.  To cut this, I placed the die face down on my paper, selected the spot I wanted to cut, then ran it through the vagabond die-cut machine.  It was easy to do and I love the look!

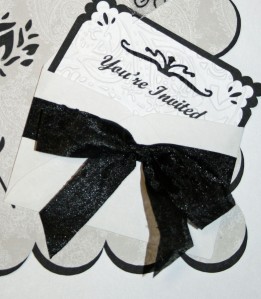
Wild BloomsTo make my mock invitation, I simply typed the phrase “You’re Invited” in my word program and printed it out on white cardstock.  I trimmed it to the size I needed for my mini envelope, then used an All Night Media corner punch and added a punched embellishment to the top center to dress it up some.  Next, I used a Sizzix  paisley/flowered embossing folder to add texture and dress it up more.  I cut a piece of black cardstock for a mat and used a McGill corner punch to finish it off.  I adhered it together and placed it in my mini envelope.  I wrapped a Creative Imaginations ribbon around the envelope and tied a bow to complete the mock invitation.

envelope and invitation

I made my calendar a little larger for this page and, once again, used the mat as a pocket for the three tags. This page is simple, yet elegant and was quick and easy to make.  Because the page is black and white, it really doesn’t look good displayed on my distressed clip board, so I plan to make another clipboard and finish it in pearl white.  Just didn’t have time to do it today!

I love reading your comments and opinions about these pages, so please let me know what you think!


Posted in General, Mixed Media and Altered Art | 2 Comments

July Calendar Page

Hello, friends, I’m back!

Things have finally began to settle down here a bit.  My Mom is much better now,  which is a real blessing!

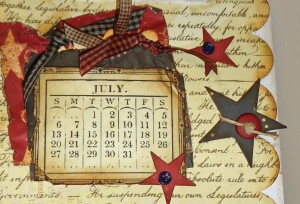
I finally made my way back down to my craft studio this week with a plan to get caught up on my calendar pages.  I realize moving to July page is a jump, since I haven’t posted June’s page yet, but I was anxious to see if my idea for the July page would work, so I started with that.  I really like the way it turned out and hope you do, too!  Hopefully, I’ll get June’s page posted by Saturday night.

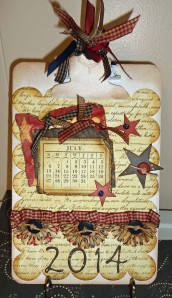
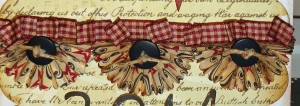
July pageI used an older line of Rusty Pickle papers (Mayflower) to complete the page.  My main idea was to make a banner border for the page using Tim Holtz mini Rosette Die Strip.  I used the larger of the two strips and cut off about 4 folds on the end.  I folded each of the three rosettes into a half circle rather than the full circle, then glued each one to a smaller circle I punched from paper.  I simply placed them side by side across the page to make the border.

July page bannerI added the ribbon border to the top of the banners.  The ribbon is randomly (and unevenly) pleated to give it a little more character and dimension.  To do it, I ran a strip of double-sided score tape down the center back of the ribbon, then created the little pleats and stuck them down as I went along.   I attached it with pop dots to raise it up to the level of the banners, then added the buttons to finish it off.

The calendar is glued to the first mat, then I used the second mat as the pocket for the tags, so I only glued them together at the sides and bottom.

July page pocket and starsI used the stacked stars die by Tim Holtz to make the stars, then added the buttons for accent.  I added ribbons to the tags and to the clipboard ring to finish off the page.

I had fun making this page and especially using the rosette die for the banners.  I wasn’t sure if it would work, but it did!

So what do you think about the page and the banners?  I’ d love to hear your comments!   I think the banner border would work for birthday pages, or just about any celebration type layout.  I hope this inspires you to make a banner border soon!
As always, please feel free to contact me if you have any questions about the layout or the techniques used or if you want to come and make one for yourself!


Posted in General, Mixed Media and Altered Art | Leave a comment